Appointments
Castellum can be used to manage appointments for test session. It will send reminder mails to subjects automatically. You can also define resources such as rooms or devices.
Set up sessions
In the Sessions tab, you can enter as many test sessions as you like.
Add session
Set up Start of test sessions and End of test sessions
Define general Session instructions
Note
In Session Instructions you can inform recruiters on conditions/requirements that may be important for or in between sessions. For example, recruiters are often asked to ensure a certain time interval between session appointments. This would be explained here.
Start and End of test sessions allows Castellum to offer an approximate overview schedule of all studies in Calendar view at Study management.
When adding a test session:
Always give the session a Name and specify the Duration of a session in minutes (duration will be used for appointment booking)
Additionally, select the Type of the session and (if applicable at your institute) select resources
You can also enter a Lab/Room for this session. If any specific appointment needs to use a different Lab/Room, they can overwrite this default value.
Additional text for reminder emails allows you to provide information to subjects prior to the actual appointment. You can send yourself a test mail to check the appearance of session reminders by using the corresponding button
If your institute uses the external scheduler to schedule appointments, you can enable it here (see Set up an external scheduler for appointments)
For existing sessions a Delete button allows you to delete any test session you created. Click on Update to review or edit session details.
Make appointments for sessions
Note
This describes setting up appointments for the participants manually by Castellum users. There is also a guide on how to use the optional external scheduler feature in Castellum that offers potential participants to select appointments by themselves: Make appointments with the external scheduler.
If you are recruiting for a study that has at least one session Castellum allows you to set up appointments for the participants:
In recruitment click on Contact in the Open list or on Review in the Participating list to get the details of the participant. Go to the tab Appointments.
The tab Appointments offers a date and time field for every session of the study. Click and populate those session fields that need to be appointed at this moment.
Hint
Study execution provides the same feature to make appointments with participating subjects. Thus, this can also be done by study conductors.
You can also select a Lab/Room and which conductors will handle this appointment.
The Calendar button in the Appointments tab opens a new window and allows you to have a look at all already appointed sessions of the study.
You can select whether conductors should receive a notification mail about this change or not.
Warning
There are cases in which for example two subjects will be tested at the same time. For that reason Castellum does not prevent you from booking overlapping appointments. You have to make sure that the required staff and resources are available yourself.
Manage resources
A resource is something that is needed in an appoitnemnt, e.g. a room or a device. If you set up resources, study coordinators can select which of those resources are required for their sessions. The main benefit is that you can then get a calendar with all appointments that are associated with this resource.
To set up a resource:
Click on Admin on the front page
Go to Resources
Click on Add Resouce (oval with grey background)
Enter a name
Select which users should have access to the resource calendar
If relevant, you can include an external calendar (ics) that contains additional events, e.g. if the resource can be blocked for reasons other than participant appointments.
The last option allows you to select a color for the external calendar events.
Click on one of the saving options
Get a list of today’s appointments
On the front page, receptionists can click on and open the Today’s appointments page. There they will see a table whose rows represent each appointment of the same day, ordered in chronological order, with the following information on each column:
Time: This column shows at which time each appointment starts.
Name: This column contains the name of each subject.
Study: This column contains the name of the study the subject is participating in.
Session: This column contains the name of the session of the study the subject is attending at.
Contact person: This column contains the name and telephone number of the person(s) responsible for this study, who are to be contacted if the receptionist needs additional information, e.g. the name and location of the room the appointment will be held on, in order to direct the subject accordingly.
Assigned conductors: This column contains the names of the assigned conductors for this session of the study.
External scheduling
Set up an external scheduler for appointments
Castellum allows the use of an external scheduler. That way subjects can select the dates for appointments for study sessions themselves.
Note
Note that this is an optional feature which may not be activated in your setup. If the links referenced in this guide are missing from the user interface, the feature is not installed. If you would like to use it, please talk to the administrator of your Castellum instance.
Find the scheduler link in Castellum
On the startpage, click Studies.
In the studies list, select a study by clicking Details.
Go to the Sessions tab.
If there are no sessions yet, create some: Set up a study for recruitment
Next to a session, click Edit.
On the bottom, under External schedule ID, click New schedule.
Create a new schedule in the scheduler
Log in to the scheduler using your credentials.
On the startpage, click Create new.
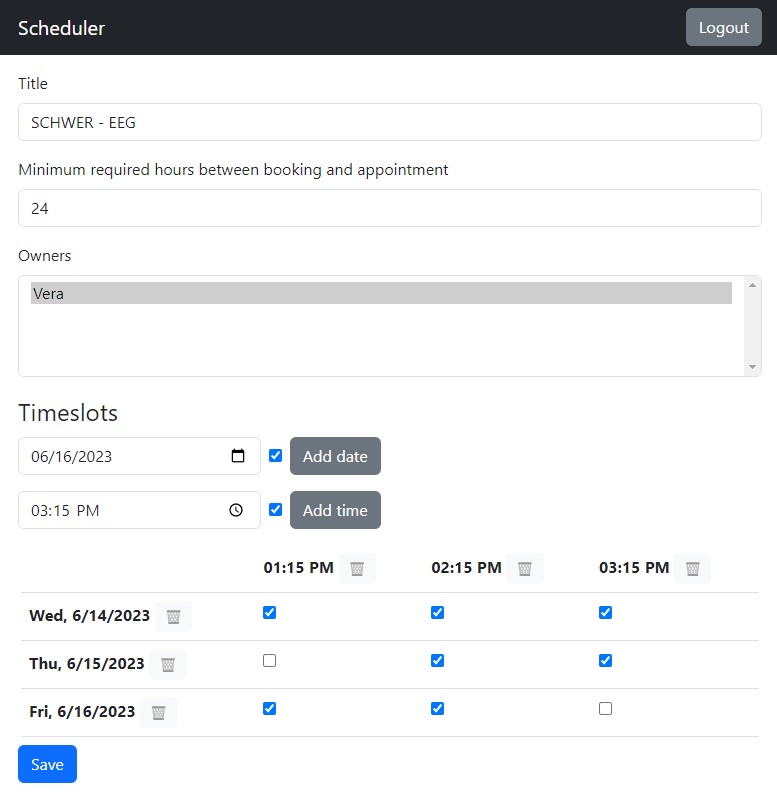
Add a meaningful title such as the name of the study, the session this scheduler refers to, or a combination of both. Keep in mind that the title will be visible to subjects.
Minimum required hours between booking and appointment: You can set how many hours before an appointment a subject should be able to book it. For example, if you need one day to prepare for an appointment, you can input ‘24’ in this field.
You can appoint yourself and other people as owners of the schedule. All owners will be able to make adjustments to the schedule.
Under Timeslots, add all dates on which appointments are available and each time confirm with Add date. Each date will add a new row to the table below.
On the next line, add all times on which appointments are available and each time confirm with Add time. Each date will add a new column to the table below.
Clicking on the checkboxes allows to deactivate individual slots for refinement.
Clicking on the trash bin symbol removes the entire row or column.
Confirm your selection by clicking Save.
After saving, the ID of this schedule will appear at the bottom, under Schedule ID. Click on Copy, to have it ready on your clipboard, as you will need it in the next step.
Enter the schedule id in Castellum
Return to the editing page of your session in Castellum. If you have closed the corresponding tab on your browser, then repeat the first step of this guide, without clicking on the New schedule link.
Under External schedule ID, paste the schedule ID.
Confirm with Save.
The scheduler can now be used in recruitment.
Make appointments with the external scheduler
Castellum allows the use of an external scheduler. That way subjects can select the dates for appointments for study sessions themselves.
Note
Note that this is an optional feature which may not be activated in your setup. If the links referenced in this guide are missing from the user interface, the feature is either not installed or not used for this session. If you would like to use it, ask the study coordinator for this study to enable it.
After the Study Coordinator has set up the external scheduler for a session of your study, you can make individual appointments for participants, or send them the individual scheduler link to book the appointment themselves.
Navigate to the participant’s individual scheduler link:
in the subject details (step for of this guide: Recruit subjects via phone), in recruitment, click Appointments.
Click Select timeslot for this subject to go to the scheduler. Clicking the “Copy” symbol will copy the scheduler link to your clipboard so you can send it to the subject via email.
In the scheduler, select an appointment and click Save. This step can also be done by the subject themself (if you’ve sent them the link), without logging in. The appointment will be visible in Castellum after a short time and the selected timeslot won’t be visible to the next subject.
If the change affects the next two working days, the relevant conductors will automatically be notified of the change.
Subscribe to Castellum calendars
Find the available calendar feeds
To access the calendar feeds overview page, add “/feeds/” to the URL of the Castellum start page.
Under “Per User” find user-specific feeds:
“all follow-ups” lists, in a single calendar, all follow-ups from all studies where you are a member.
“all appointments” shows, in a single calendar, all appointments from all studies where you are a member.
Under “Per Study”, find all appointments for each study where you are a member.
Under “Per Resource” find all occupied slots for all resources.
Example
The MPI for Human Development uses a two-step process for booking appointments of shared resources:
A resource committee allocates time slots fairly across upcoming studies (in a dedicated room booking system outside of Castellum).
Study recruiters are allowed to assign appointments within these time slots (in Castellum).
In order to check availability of a resource it is sufficient to subscribe to the “Per Resource” feed. However, to check whether it is possible to swap open slots with other studies users have to match this feed information with the external calendar view of the room booking system.
Reset user tokens
Each calendar feed URL contains a token that uniquely identifies you so you can access feeds that would not be available to other users.
If another person gains access to that token they can consequently access confidential information from Castellum. So in that case the token needs to be reset.
An administrator can delete the token in the admin UI. A new one will be generated automatically.
Privacy and cloud based calendars
Castellum is usually running behind a firewall, so cloud based calendar services (e.g. Google Calendar) do not have access to these calendar feeds.